I purchased some beautiful Merino Superwash in this lovely lilac color at my Local Yarn Store. As soon as I put hook to yarn, this gorgeous Bunny Bonnet began to take shape! I love the texture of the Bonnet as well as the little bunnies that play along the Brim! I think the timing is just perfect with both the first day of Spring and Easter just around the corner!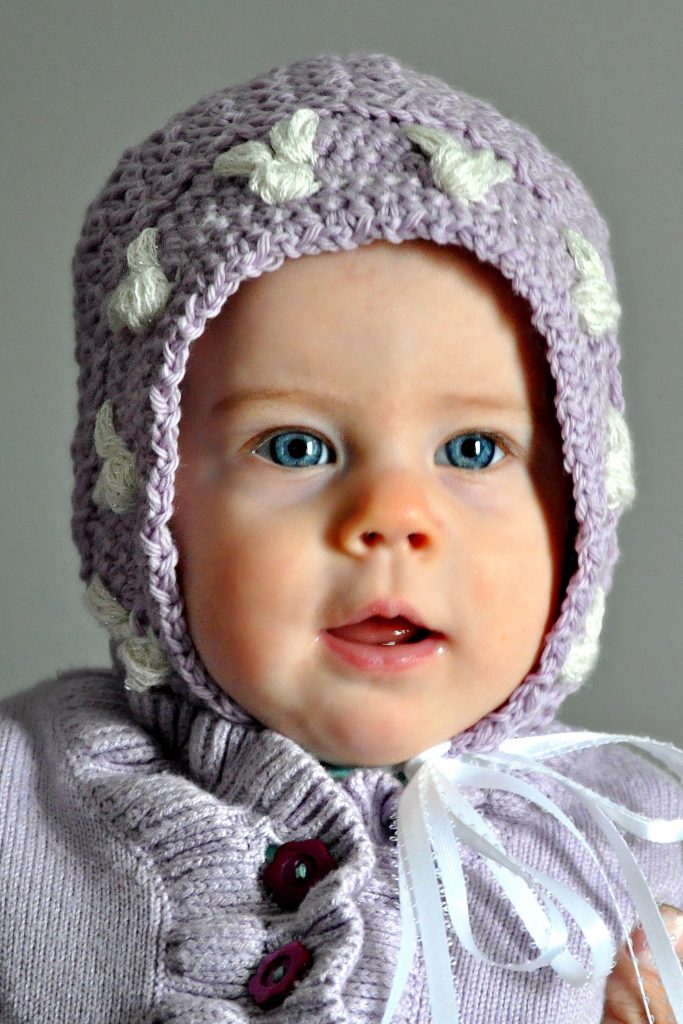
>>> CLICK HERE TO SIGN UP FOR THE SINCERELY, PAM WEEKLY NEWSLETTER! <<<
Here is the Newborn Size of the Hunny Bunny Bonnet. You can get all sizes Newborn – 5 years in my Ravelry Shop for $5.00 USD. Picture shown above shows the 9 month size.
Materials
- Yarn: DK weight #3 I used 1 skein (135 yards) Diamond Luxury Fine Merino and 6 yards of Downton Abbey Lady Mary.
- H (5.0mm) hook
- Measuring Tape
- Tapestry Needle
- 70” of coordinating ribbon, cut in half, 35” per side.
Pattern Key
- ch: chain
- st(s): stitch(es)
- sk: skip
- sp: space
- slst: slip stich
- sc: single crochet
- hdc: half double crochet
Experience Level
- Intermediate
Gauge
- 17 sc and 10 Rows in 4”
Finished Measurement
- Newborn (5″ tall x 5″ deep, fits a 13-14″ head)
>> Grab a copy of the ad-free pdf HERE! <<<
Special Pattern Notes
This pattern is worked in a continuous Round for the first part of the Bonnet which will be the back of the hat. After you switch to working back and forth in Rows until desired length.
The back of the Bonnet is written in separate instructions for each size. Once you start the pattern repeats, it is the same for each size with the stitch count in sequential order, by size (NB, 3-6, 9-12, 2-5 yrs)
This pattern was written using two colors. MC (main color) is lavender and CC (contrast color) is Lily Ice. CC is only used in Rows 6 and 7 of the Brim and is carried behind the MC when not in use.
Special Stitches
Bunny Ears: Puff2tog: Yo, (insert hook into skipped stitch 3 Rows below, yo, pull up a loop, yo, pull through 2 loops) 3 times (4 loops on hook), yo, pull through 3 loops, yo, (insert hook into next skipped stitch 3 Rows below, yo, pull up a loop) 3 times (5 loops on hook), yo, pull through 4 loops, yo, pull through all remaining loops.
Bunny Head: Bobble St – (Yo, insert hook into st, yo pull up loop, yo, pull through 2 loops) 5 times (6 loops on hook), yo, pull through all remaining loops.
Copyright Notice
You are free to sell what you make from this pattern, but you may not share, copy or reproduce this pattern in part or whole.
Photographs are also copyright protected and may not be used. Please link back to one of my shops if selling your finished items online.
(c) Pamela Dajczak 2016 Sincerely Pam
Pattern Instructions
1: (MC) Starting with a magic circle, ch1, 10hdc in circle, pull gently to close. (10 hdc)
2: 2hdc around. (20 hdc)
3: *Hdc, 2hdc, repeat from * around. (30 hdc)
4: *Hdc next 2, 2hdc, repeat from * around. (40 hdc)
5: *Hdc next 19, 2hdc, repeat from * once more. (42 hdc)
Pattern Repeat
1: Ch1, turn, sk first st, *(sc, ch1, sc) in next, sk1st, repeat from * across. (42 sc)
2: Ch1, turn,*(sc, ch1, sc) in each ch-1 space from previous Row. (42 sc)
Repeat 2 until Bonnet measures 3” from Row 1, ending on the Wrong Side.
Brim
1: Ch1, turn, Right Side, working in the Back Loop only, sc in each sc across. (42 sc)
2: Ch1, turn, sc across. (42 sc)
3: Ch1, turn, sc first 5, ch1, sk1st, sc next 3, ch1, sk1st, *sc next 2, ch1, sk1st, sc next 3, ch1, sk1st, repeat from * across to last 4, sc remaining sts. (32 sc) These skipped sts are the ones you will work into in Row 6.
4: Ch1, turn, sc in each st and ch-1 space across. (42 sc)
5: Ch1, turn, sc across. (42 sc)
6: Ch1, turn, sc first 6, (using CC) Puff2tog (see special stitch on Page 2), skip the stitch directly behind the Puff2tog, * (MC) sc next 6, (CC) Puff2tog (skip stitch behind), repeat from * across until 7 sts remain, sc in remaining sts. (42 sts) (5 sets of Bunny Ears)
7: Ch1, turn, (MC) sc in each sc and (CC) Bobble in each Puff2tog. (42 sts) (5 Bunny Heads)
8-9: (MC) Ch1, turn, sc across. (42 sc)
10: Ch1, turn, sc in first, sk1st, *(sc, ch1, sc) in next, sk1st, repeat from * across. (42 sc)
Fasten off and weave in ends.
Finishing
Add one length of ribbon to the bottom corner of the Bonnet by pulling one end through a ch-1 space. Once you are halfway down the length of the Ribbon, secure with a knot. Repeat on other side.
Leave a Reply